
NFC chips with EventPos
How to choose which products go on the EventPos chip, connect chips at the entrance and keep track of what has been used.
With EventPos, your crew's products, such as meal vouchers and drinks, can be put on an NFC chip in a wristband or a card. Crewstack sends the products to EventPos, and the chip is connected to the person when they are checked in. Here you can see how to choose the products and keep track.
Before you start
- Crewstack sets up the integration with EventPos for you when you have an agreement with us about it. Write to support@crewstack.io.
- The products need Super Admin.
- The products have to exist in Crewstack. See Create products and give them to your crew.
See also RFID, NFC and digital wallets for an overview of the options.
Choose what goes on the chip
Only products linked to a product at EventPos go on the chip. To link a product:
- Go to Tickets > Products, and click Edit next to the product.
- Find the EventPos product section in the window.
- Choose an EventPos product you have linked before from the list. If it is a new one, click Create new product, and fill in Product name, Product ID and Product type number as they are at EventPos.
- Tick Shift dependent if the product should only work while the person is on shift.
- Optionally type a number of minutes in Shift period buffer (minutes). The product then works that many minutes before and after the shift.
- Save the product.
Chose existing product switches back to the list, and Remove EventPos product removes the link. System items such as Scanner can't be linked.
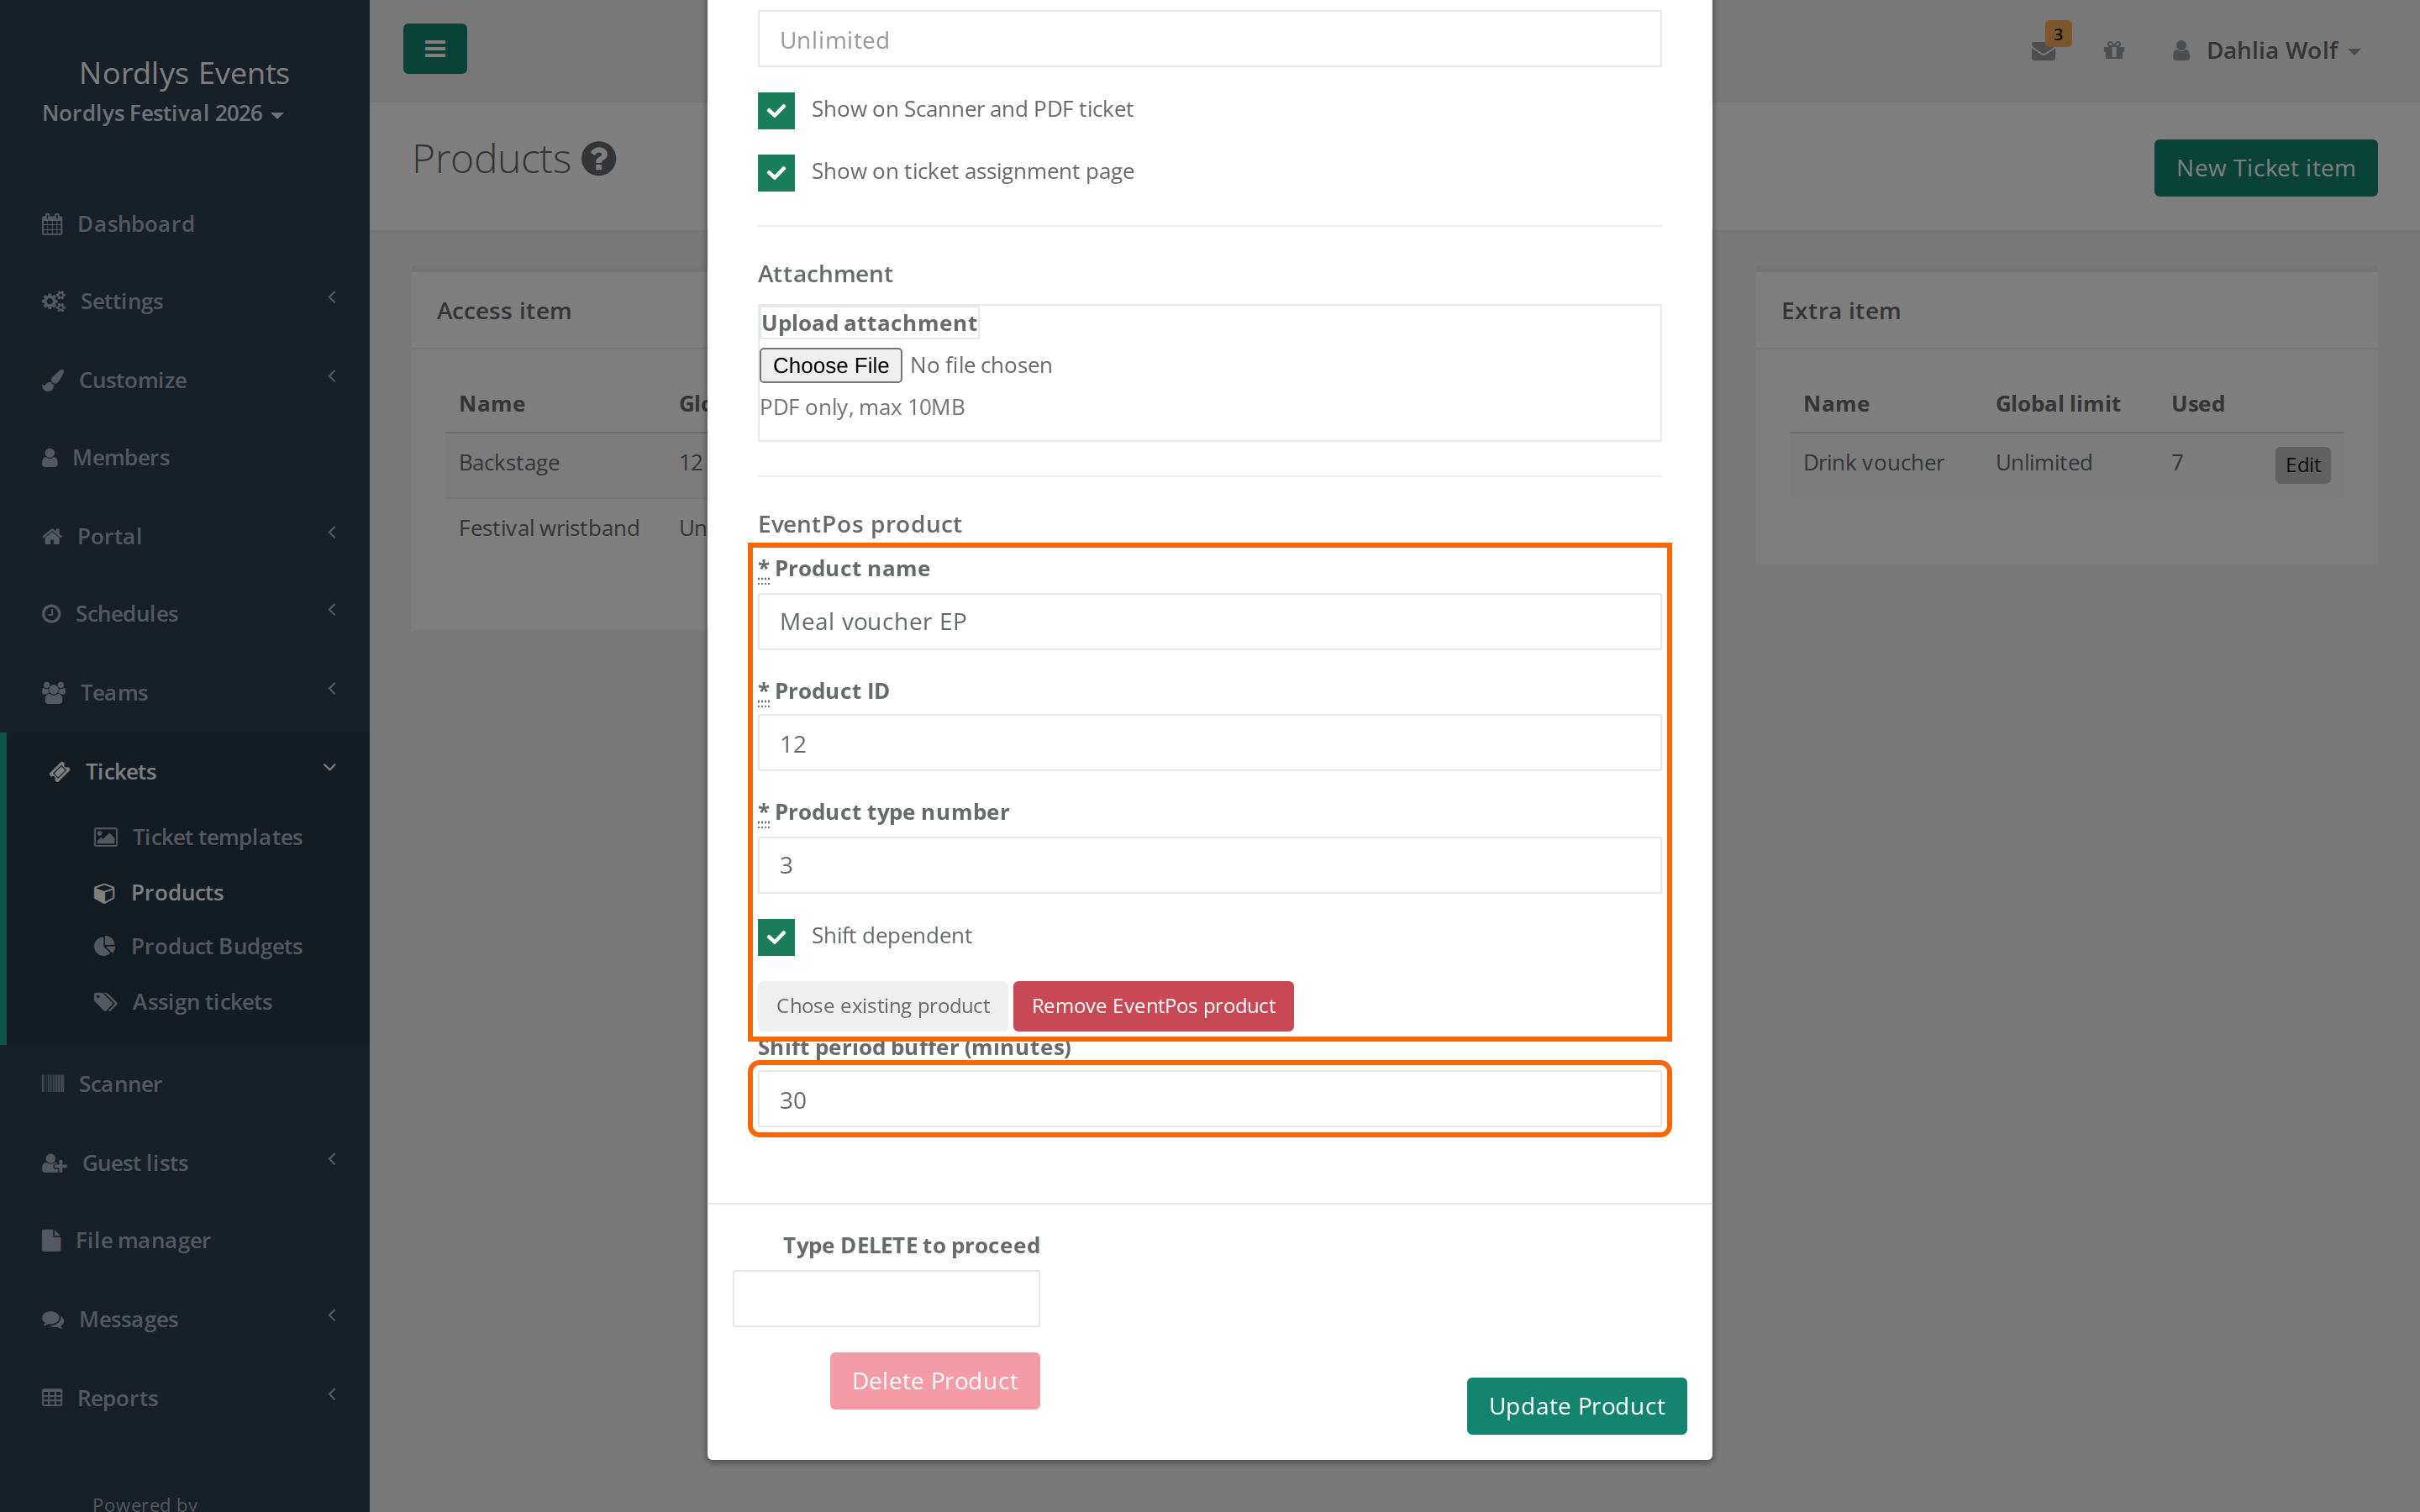
How Shift dependent works: If the person has, say, three meal vouchers and three shifts, the first meal voucher works during the first shift, the second during the second shift and so on. If there are more vouchers than shifts, the extra ones work all the time.
When you save the link, the chip is updated for everyone who has the product and a chip. The same happens when a person gets or loses products, or when the person's shifts change. It happens in the background and can take a moment.
Connect the chip at the entrance
The chip is connected in the scanner. When a person with products for the chip is checked in, the Connect chip card window opens:
- Scan the chip with the NFC reader so the number goes into the Chip number (fill in with NFC scanner) field.
- Click Connect chip to user.
If the person already has a chip, the button says Replace existing chip instead. Click Continue without chip activation to skip.
The chip number has to be 10 to 16 characters. Otherwise it says "NFC chip id must be 10-16 characters". Scan the chip again.
See also Scanner / Scanning tickets.
Has the person lost their chip? Scan the person's ticket, click Check-in anyway!, scan the new chip, and click Replace existing chip. The new chip replaces the old one.
See the chip on the person's profile
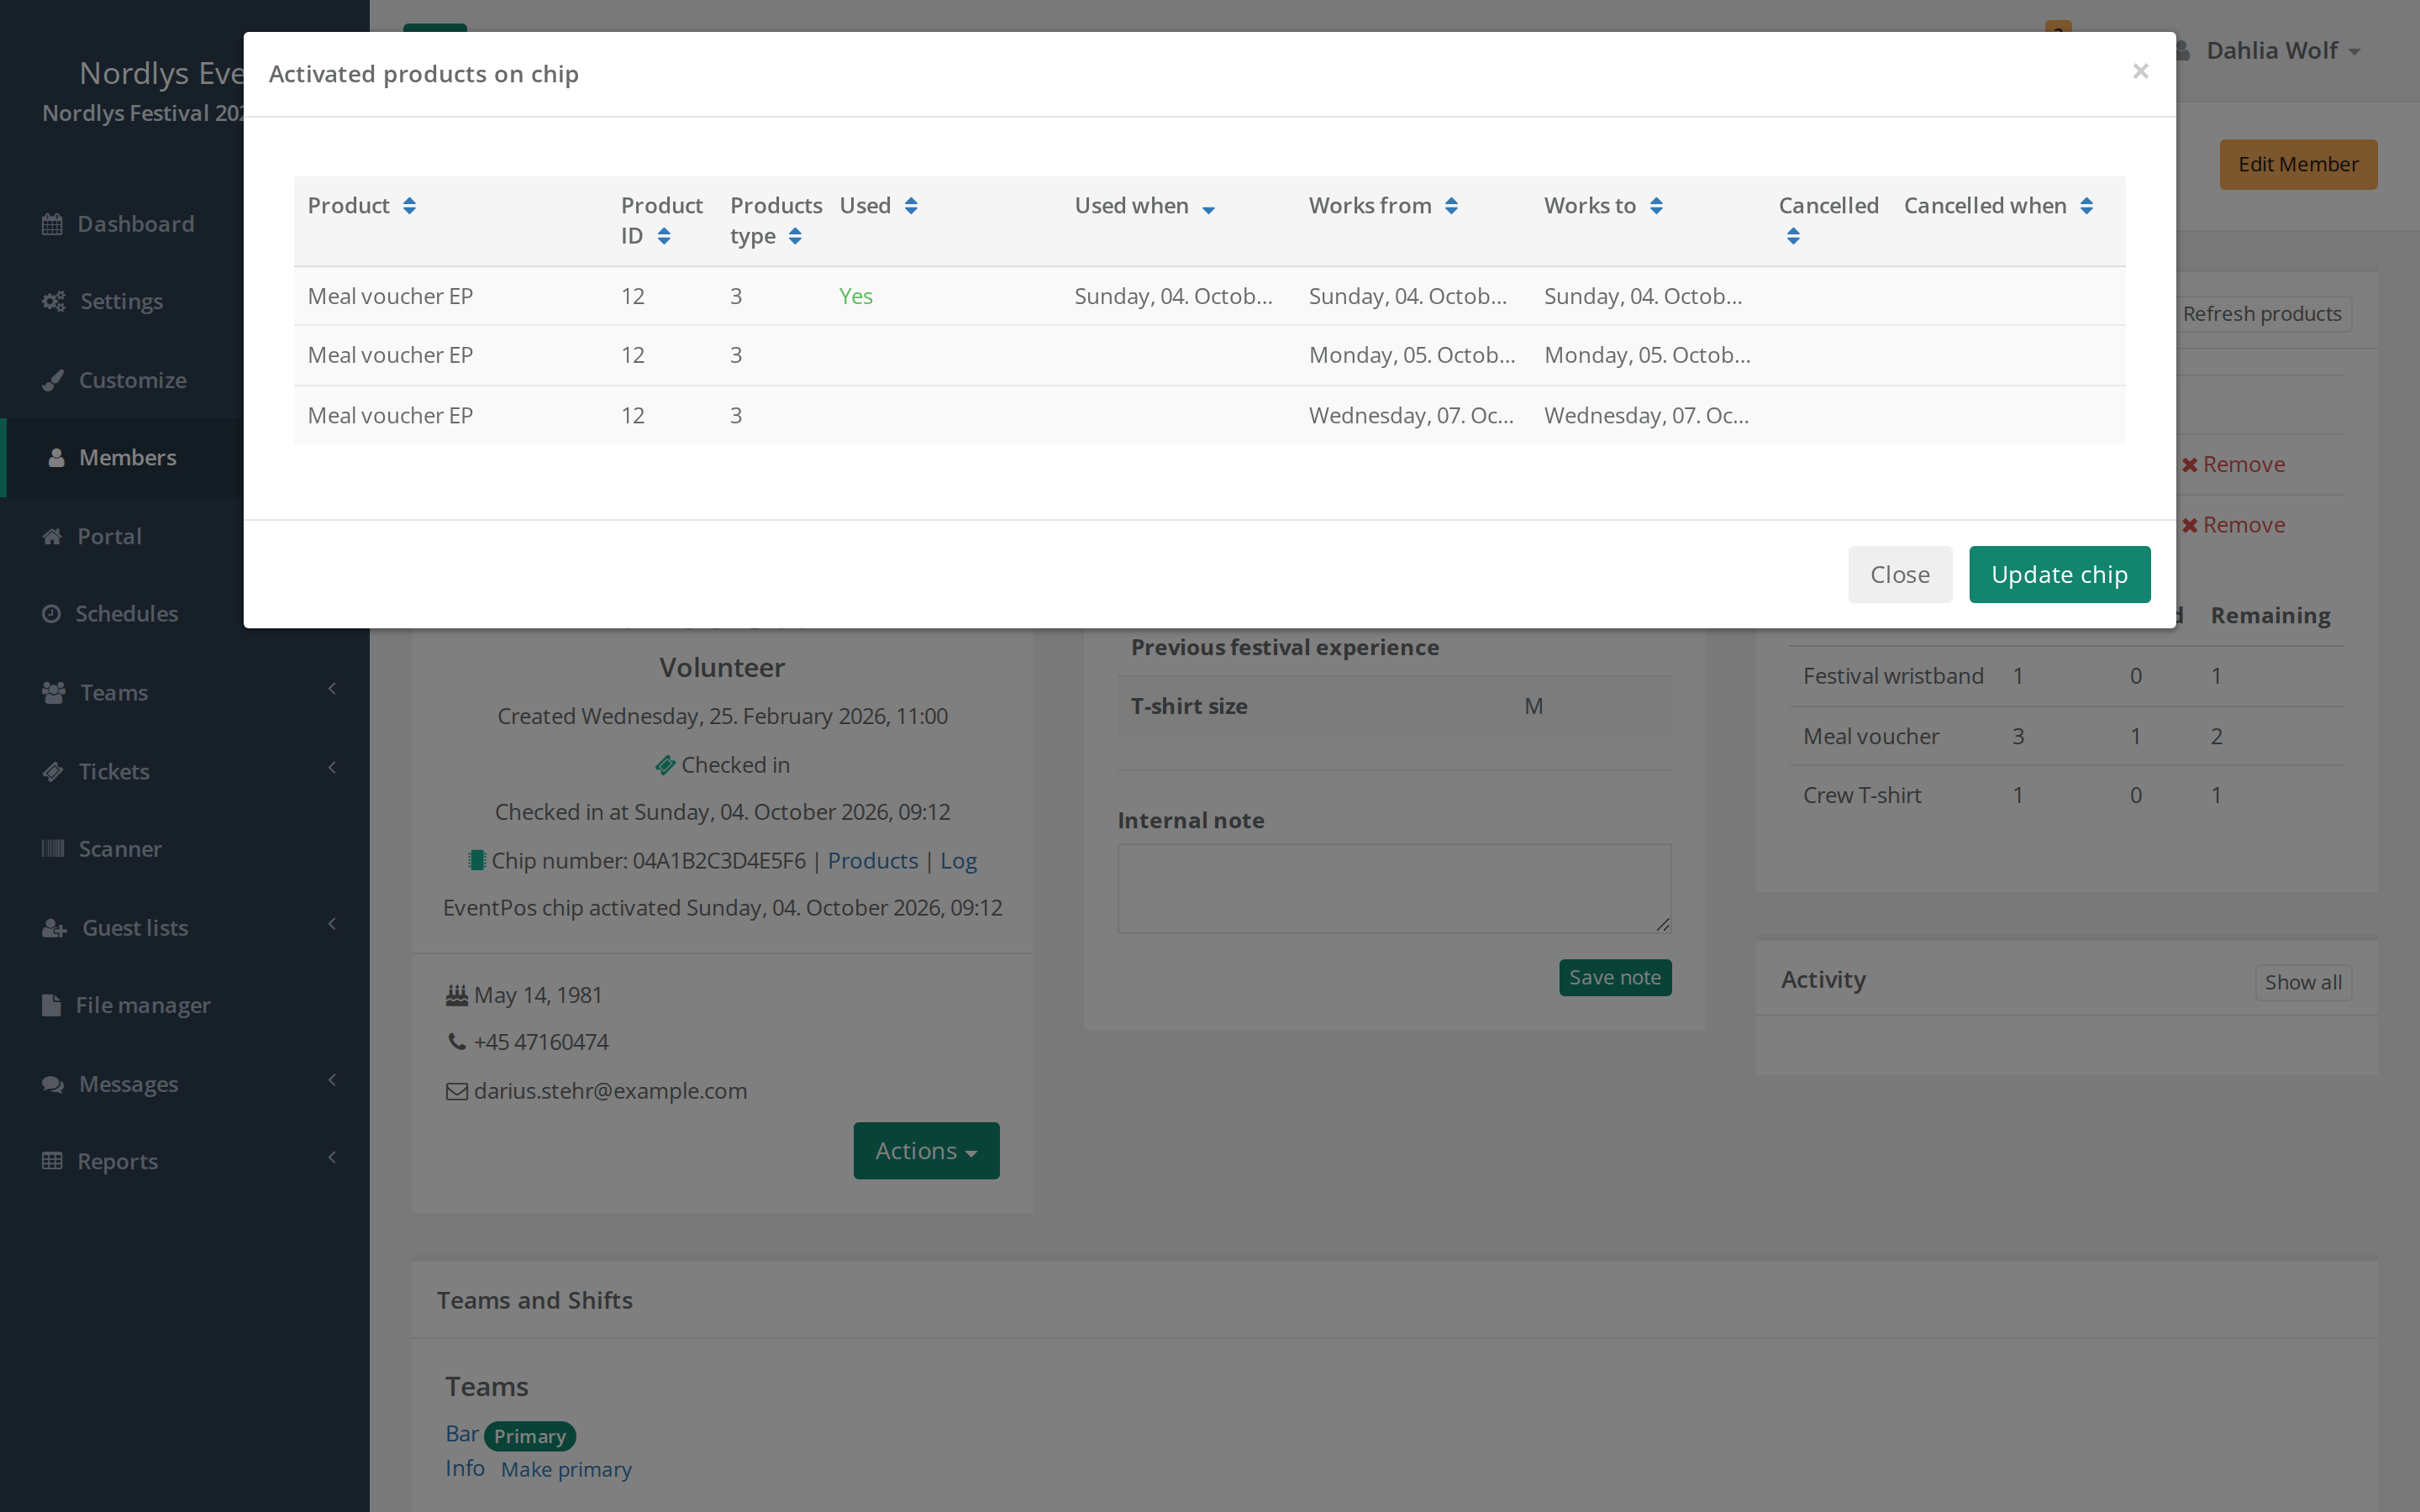
Under the person's name you see "Chip number: …", when the chip was activated, and two links:
- Products opens Activated products on chip. It lists every product on the chip, whether it is Used, when, and when it works, in columns such as Used when, Works from and Works to.
- Log opens Chip log with every time the chip has been used: Timestamp, Device and Location. You can search the log.
If a product is missing from the chip, click Update chip at the bottom of Activated products on chip. You see "Chip products have been updated.".
The Ticket item box on the profile also shows when the chip was activated (Chip aktiveret, in Danish), and the list of products gets the columns Used and Remaining. Only admins can see the box.
Remove a chip
If a chip is connected to the wrong person, an admin can remove it:
- Open the person's profile.
- Click Remove next to Chip aktiveret in the Ticket item box.
- Optionally type a Reason, and click Remove EventPos chip.
The chip stops working and is no longer connected to the person. To connect a new chip, scan the person's ticket, click Check-in anyway!, and scan the new chip in the Connect chip card window.
What your crew sees
In the Crewstack app, the person's products are listed under the Ticket tab in the Food & drinks section. When the person has a chip, it also shows how much has been used ("Used 1 of 3") and how many are Left. Refresh fetches the numbers again.
Ask the crew member to tap Refresh if the numbers look wrong.
Pitfalls
- The Connect chip card window doesn't open. Check that the person has at least one product linked to EventPos. If the window doesn't open for anyone, write to support@crewstack.io.
- A product is missing from the chip. The product isn't linked to an EventPos product, or the update hasn't come through yet. Click Update chip.
- Used products don't go away. If a person loses a product, only the unused ones are removed from the chip.
- Do you use Corego? Then this guide doesn't apply. See Corego wallet with QR tickets.
Didn't find the answer? Write to support@crewstack.io.