
Create products and give them to your crew
How to create products such as wristbands, meal vouchers and parking permits, and how they end up on your crew's tickets through a member type, a team or assignment.
Everything your crew should get, such as wristbands, meal vouchers, a crew T-shirt or a parking permit, you create as products. Products appear on the person's ticket and in the scanner. You decide who gets what.
Three kinds of products
Products are split into three groups:
- Access item: access to the event, for example a wristband or an access card.
- Addon item: add-ons such as meal vouchers and drink vouchers.
- Extra item: everything else, for example a T-shirt or a parking permit.
The group decides which field the product appears in on the ticket template. Access items can't be given to a single person under Assign tickets.
There are also the system items Scanner and Ticket assignment. They give access to the scanner and to the Assign tickets page. They aren't listed under Products and can't be deleted.
Create a product
- Go to Tickets > Products.
- Click New Ticket item.
- Choose the group: Access item, Addon item or Extra item.
- Enter the Name. If the event has several languages, there is a tab with a flag for each language. The name must be unique in the event.
- Fill in the other fields (see below) and click Create Ticket item.
The fields in the window:
- Global limit: the highest number that may be handed out in total. If you leave the field empty, it says Unlimited, and there is no cap.
- Show on Scanner and PDF ticket: if you untick it, the product shows neither on the ticket nor in the scanner.
- Show on ticket assignment page: if you untick it, the product can't be chosen under Assign tickets.
- Attachment: a PDF the person can download together with their ticket. See the PDF section below.
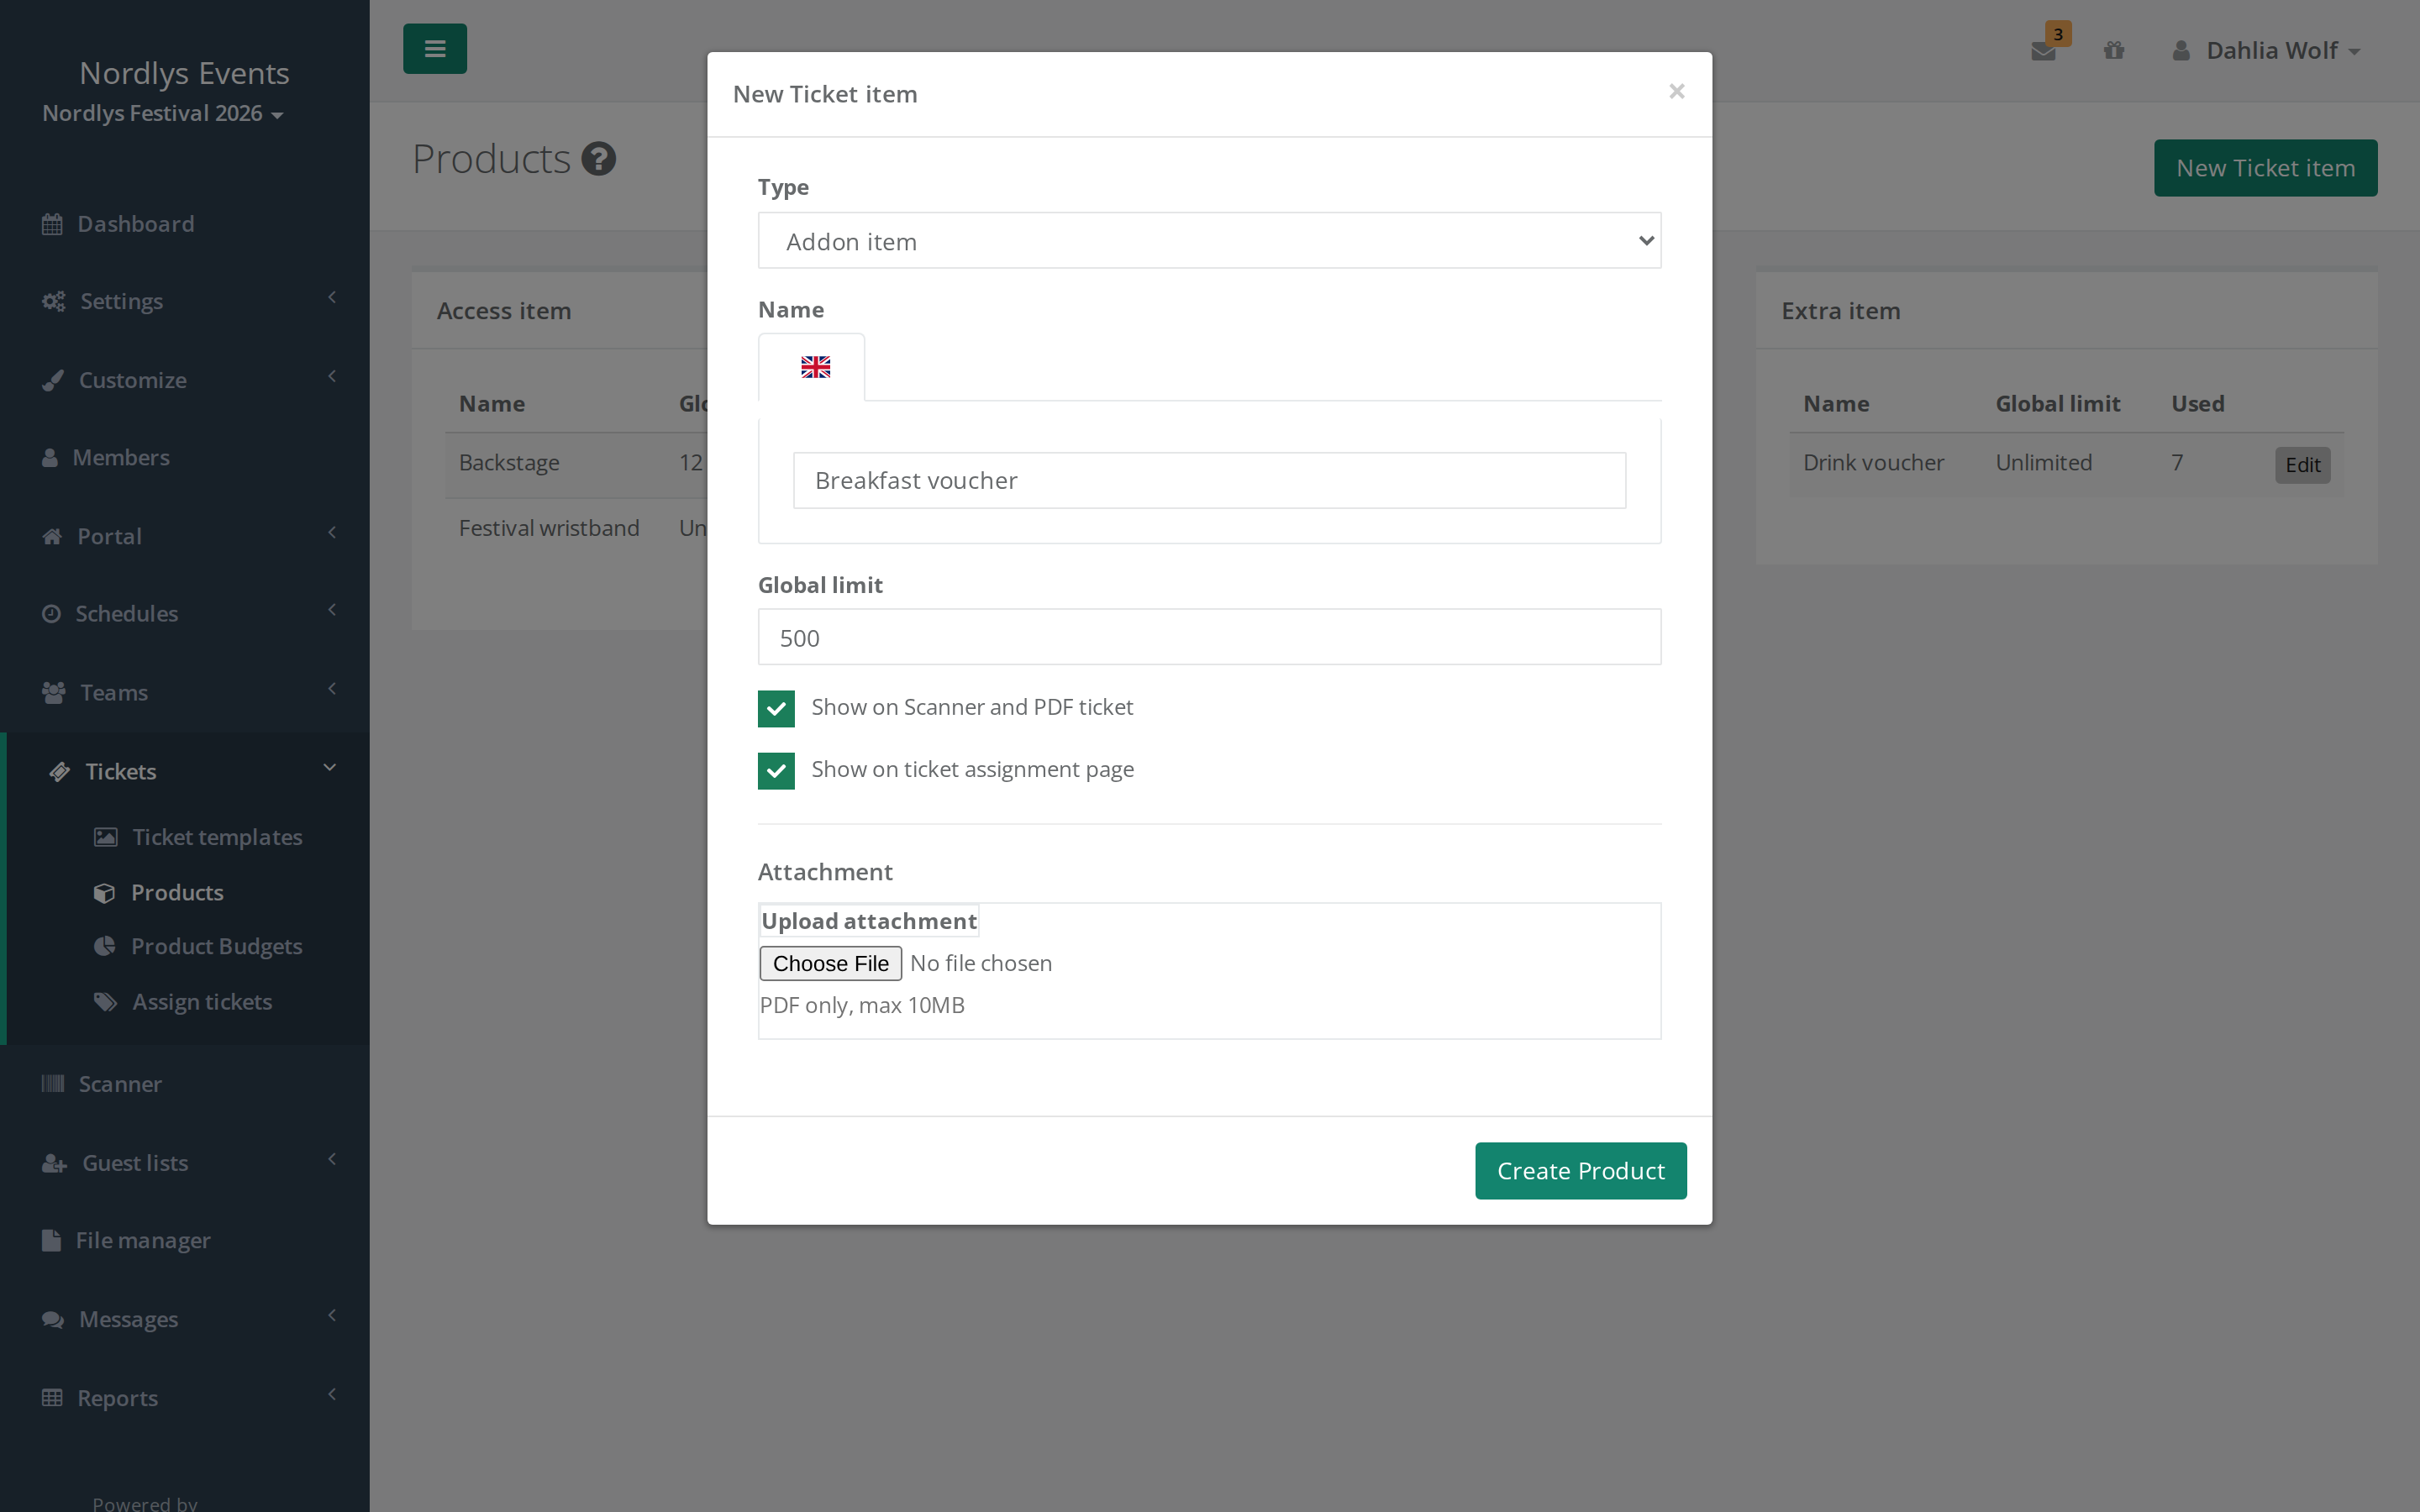
The list under Products shows Name, Global limit and Used for each product. Used is the number handed out in total.
Give the products to your crew
| Where | Who gets the product |
|---|---|
| The member type | Everyone with the member type |
| The team | Everyone on the team, including people who join later |
| Bonus ticket items on the member type | Everyone with the member type who has enough shifts or shift hours |
| Assign tickets | One person at a time. See Assign tickets to a single person. |
| A guest list | The guests on the list. See Create a guest list. |
To a whole member type
- Go to Settings > Member types.
- Click Actions next to the member type and choose Edit Member type.
- Click Add product under Ticket items.
- Choose the product and enter the Quantity.
- Save the member type.
To a team
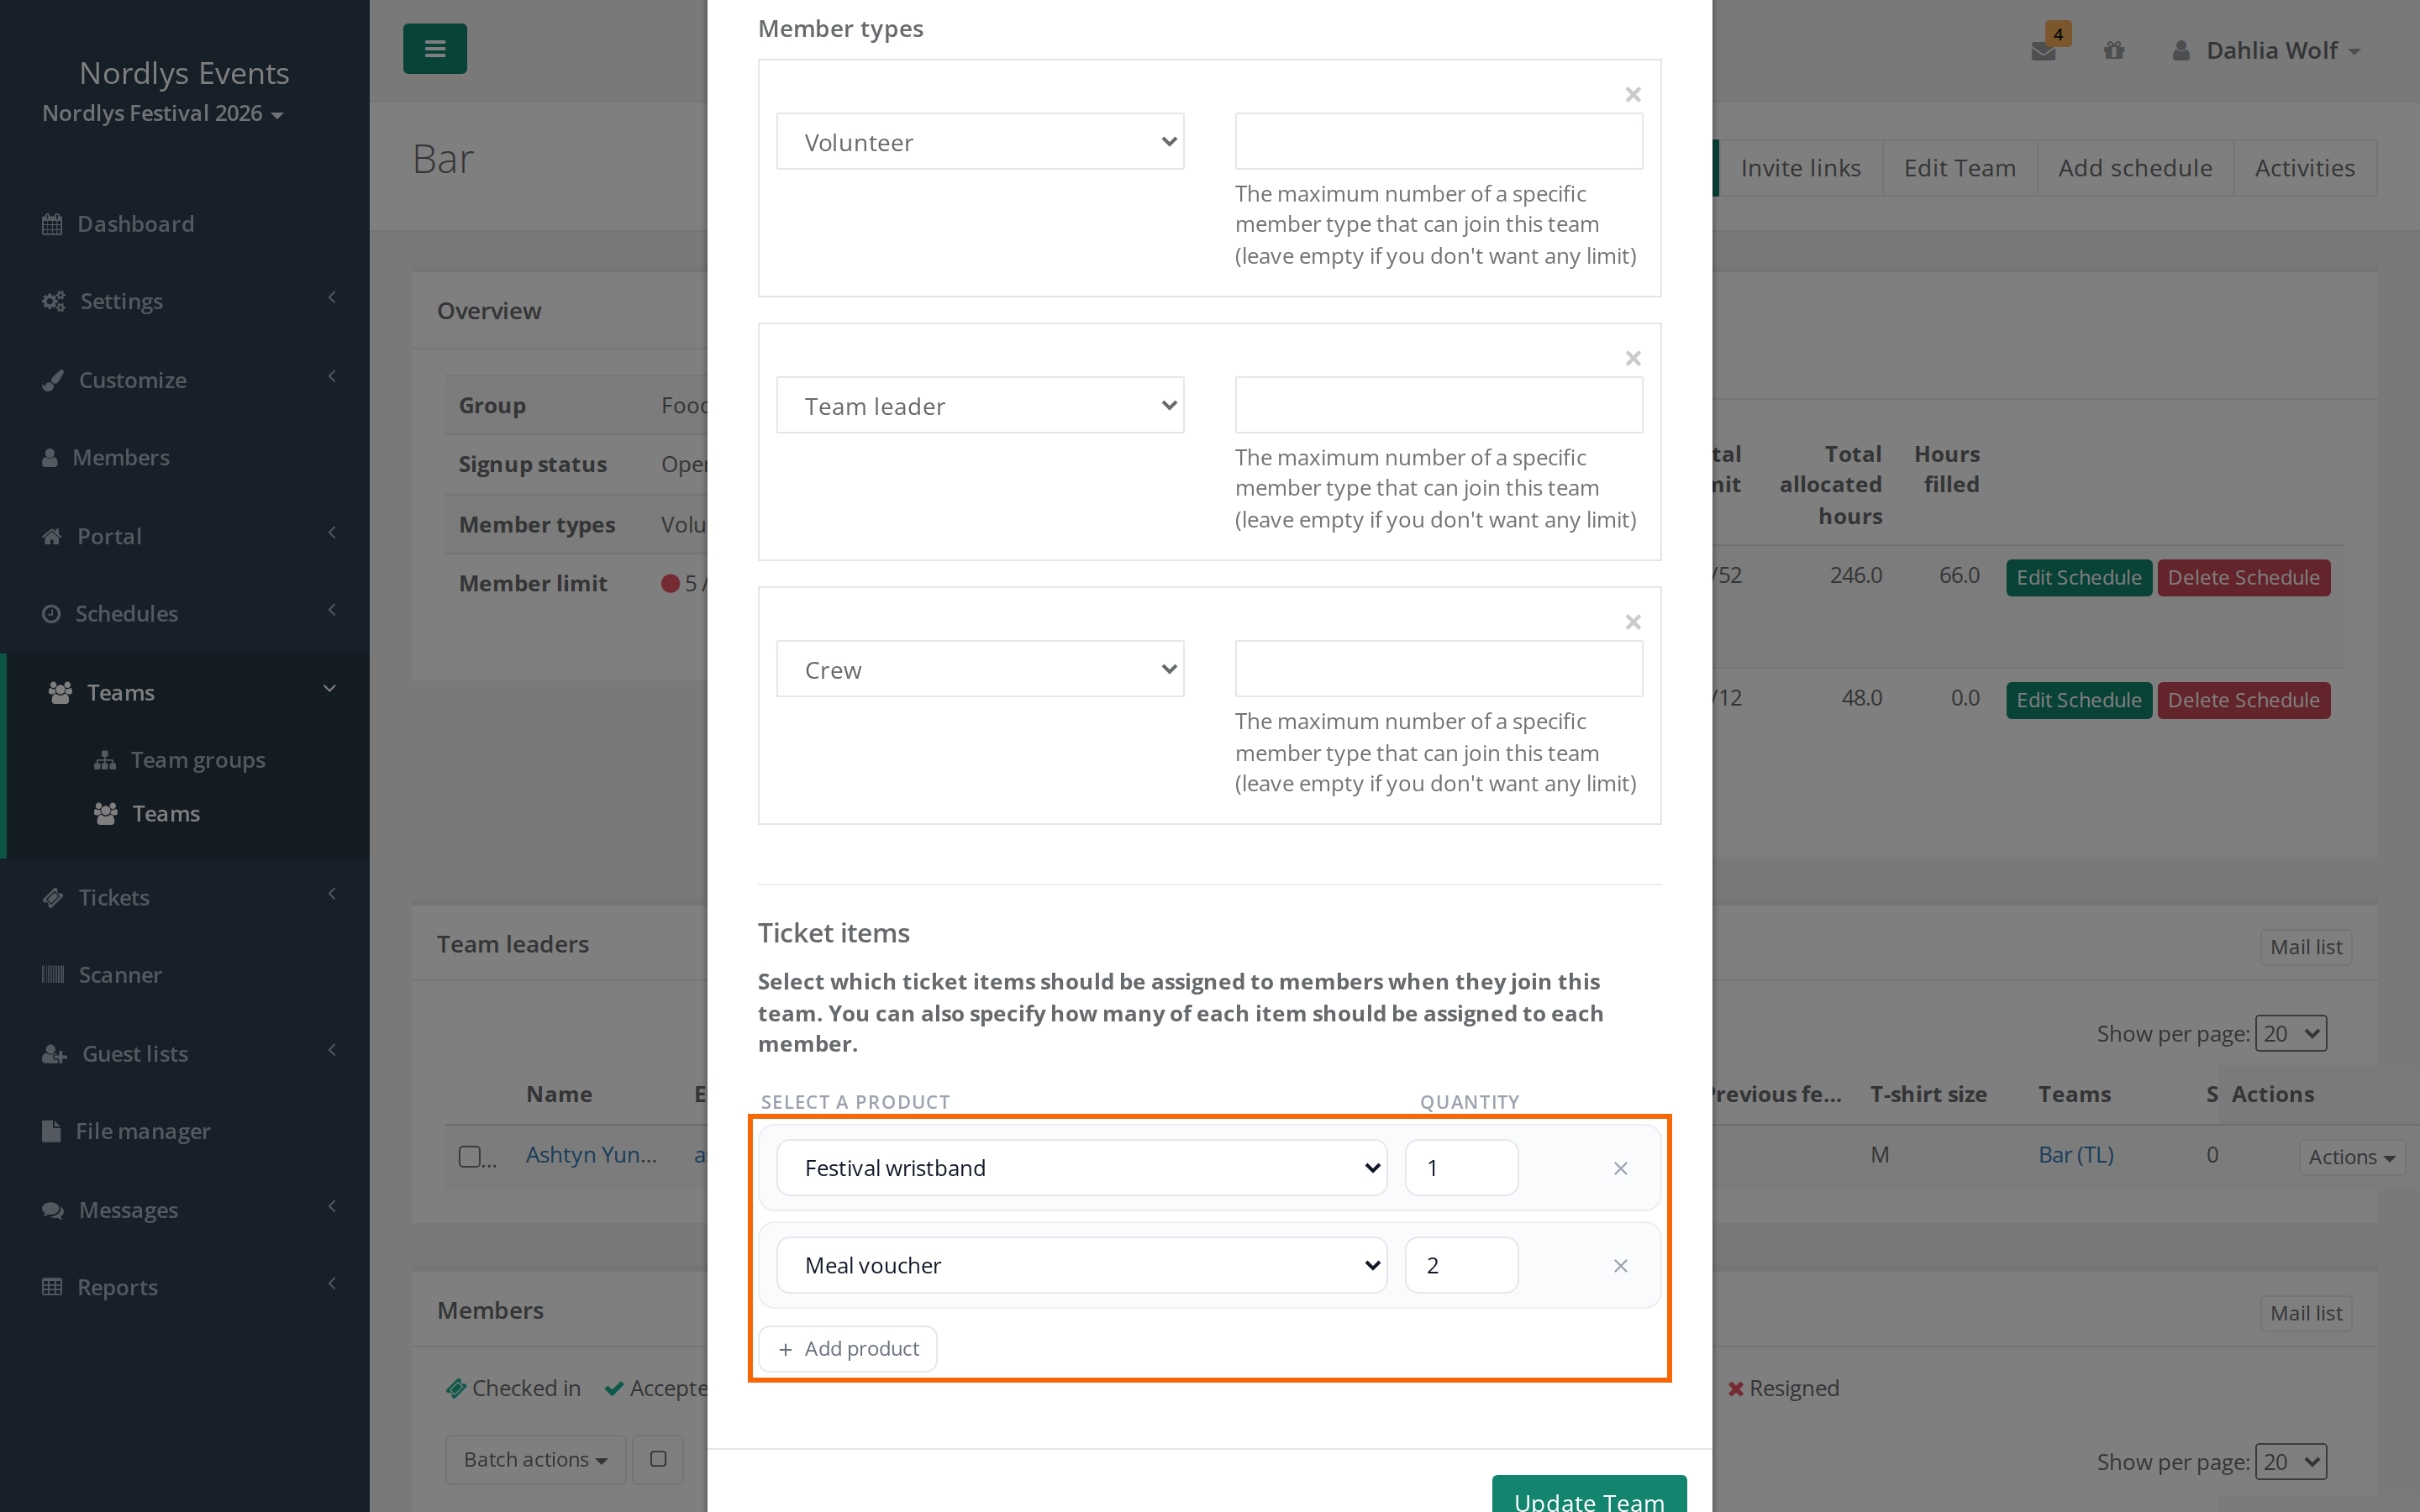
- Go to Teams > Teams and open the team.
- Click Edit Team.
- Click Add product under Ticket items.
- Choose the product and enter the Quantity.
- Save the team.
Everyone on the team gets the product, and so do new members. If a person leaves the team, the product disappears from them again. Only admins and team group leaders can edit a team.
Here Crewstack checks the product's Global limit. If there aren't enough, the team isn't saved and you get the message "There is not enough Wristband available" (with the name of your product).
Bonus products for hours or shifts
On the member type you can also give extra products based on how much a person works, for example an extra meal voucher from 8 hours. When a person with the member type has the number of hours or shifts you set, the product is added to them automatically. Only shifts on published schedules count.
- Go to Settings > Member types.
- Click Actions next to the member type and choose Edit Member type.
- Click Add bonus ticket item under Bonus ticket items.
- Choose the product under Select product and enter the amount after Give.
- In the two number fields, enter from how many and up to how many the rule applies. If you leave the last field empty (it shows ∞), there is no upper limit.
- Choose hours worked or shifts taken.
- Save the member type.
Below the row it says what the rule does, for example "Gives 1 × Meal voucher to members with 8 or more hours worked, counted on published shifts." If the rule has an upper limit, only people between the two numbers get the product.
You can only choose products from the groups Addon item and Extra item. A member type can have several rules.
How many does the person get?
The amounts from all places are added up. If the member type gives 1 wristband and the team also gives 1 wristband, the person has 2 wristbands. If a product appears more than once on the ticket, the amount is shown in brackets, for example Meal voucher (3).
System items count once at most.
See a person's products
Open the person's profile. The Ticket item box on the right lists the products with Name and Amount. Only admins can see the box.
Changes are applied in the background, so it can take a moment. If the list looks wrong, click Refresh products at the top of the box.
If you use EventPos or Corego for the products, see NFC chips with EventPos and Corego wallet with QR tickets.
Attach a PDF
You can add a PDF to a product, for example a parking permit, a site map or practical information. Everyone who has the product can download the PDF together with their ticket. That applies to crew members and guests alike.
- Go to Tickets > Products and click Edit next to the product. You can also do this while you create the product.
- Click Upload attachment under Attachment and choose the file.
- Save the product.
The file must be a PDF under 10 MB. Each product can have one PDF. If you upload a new one, it replaces the old one. The field is then called Replace attachment.
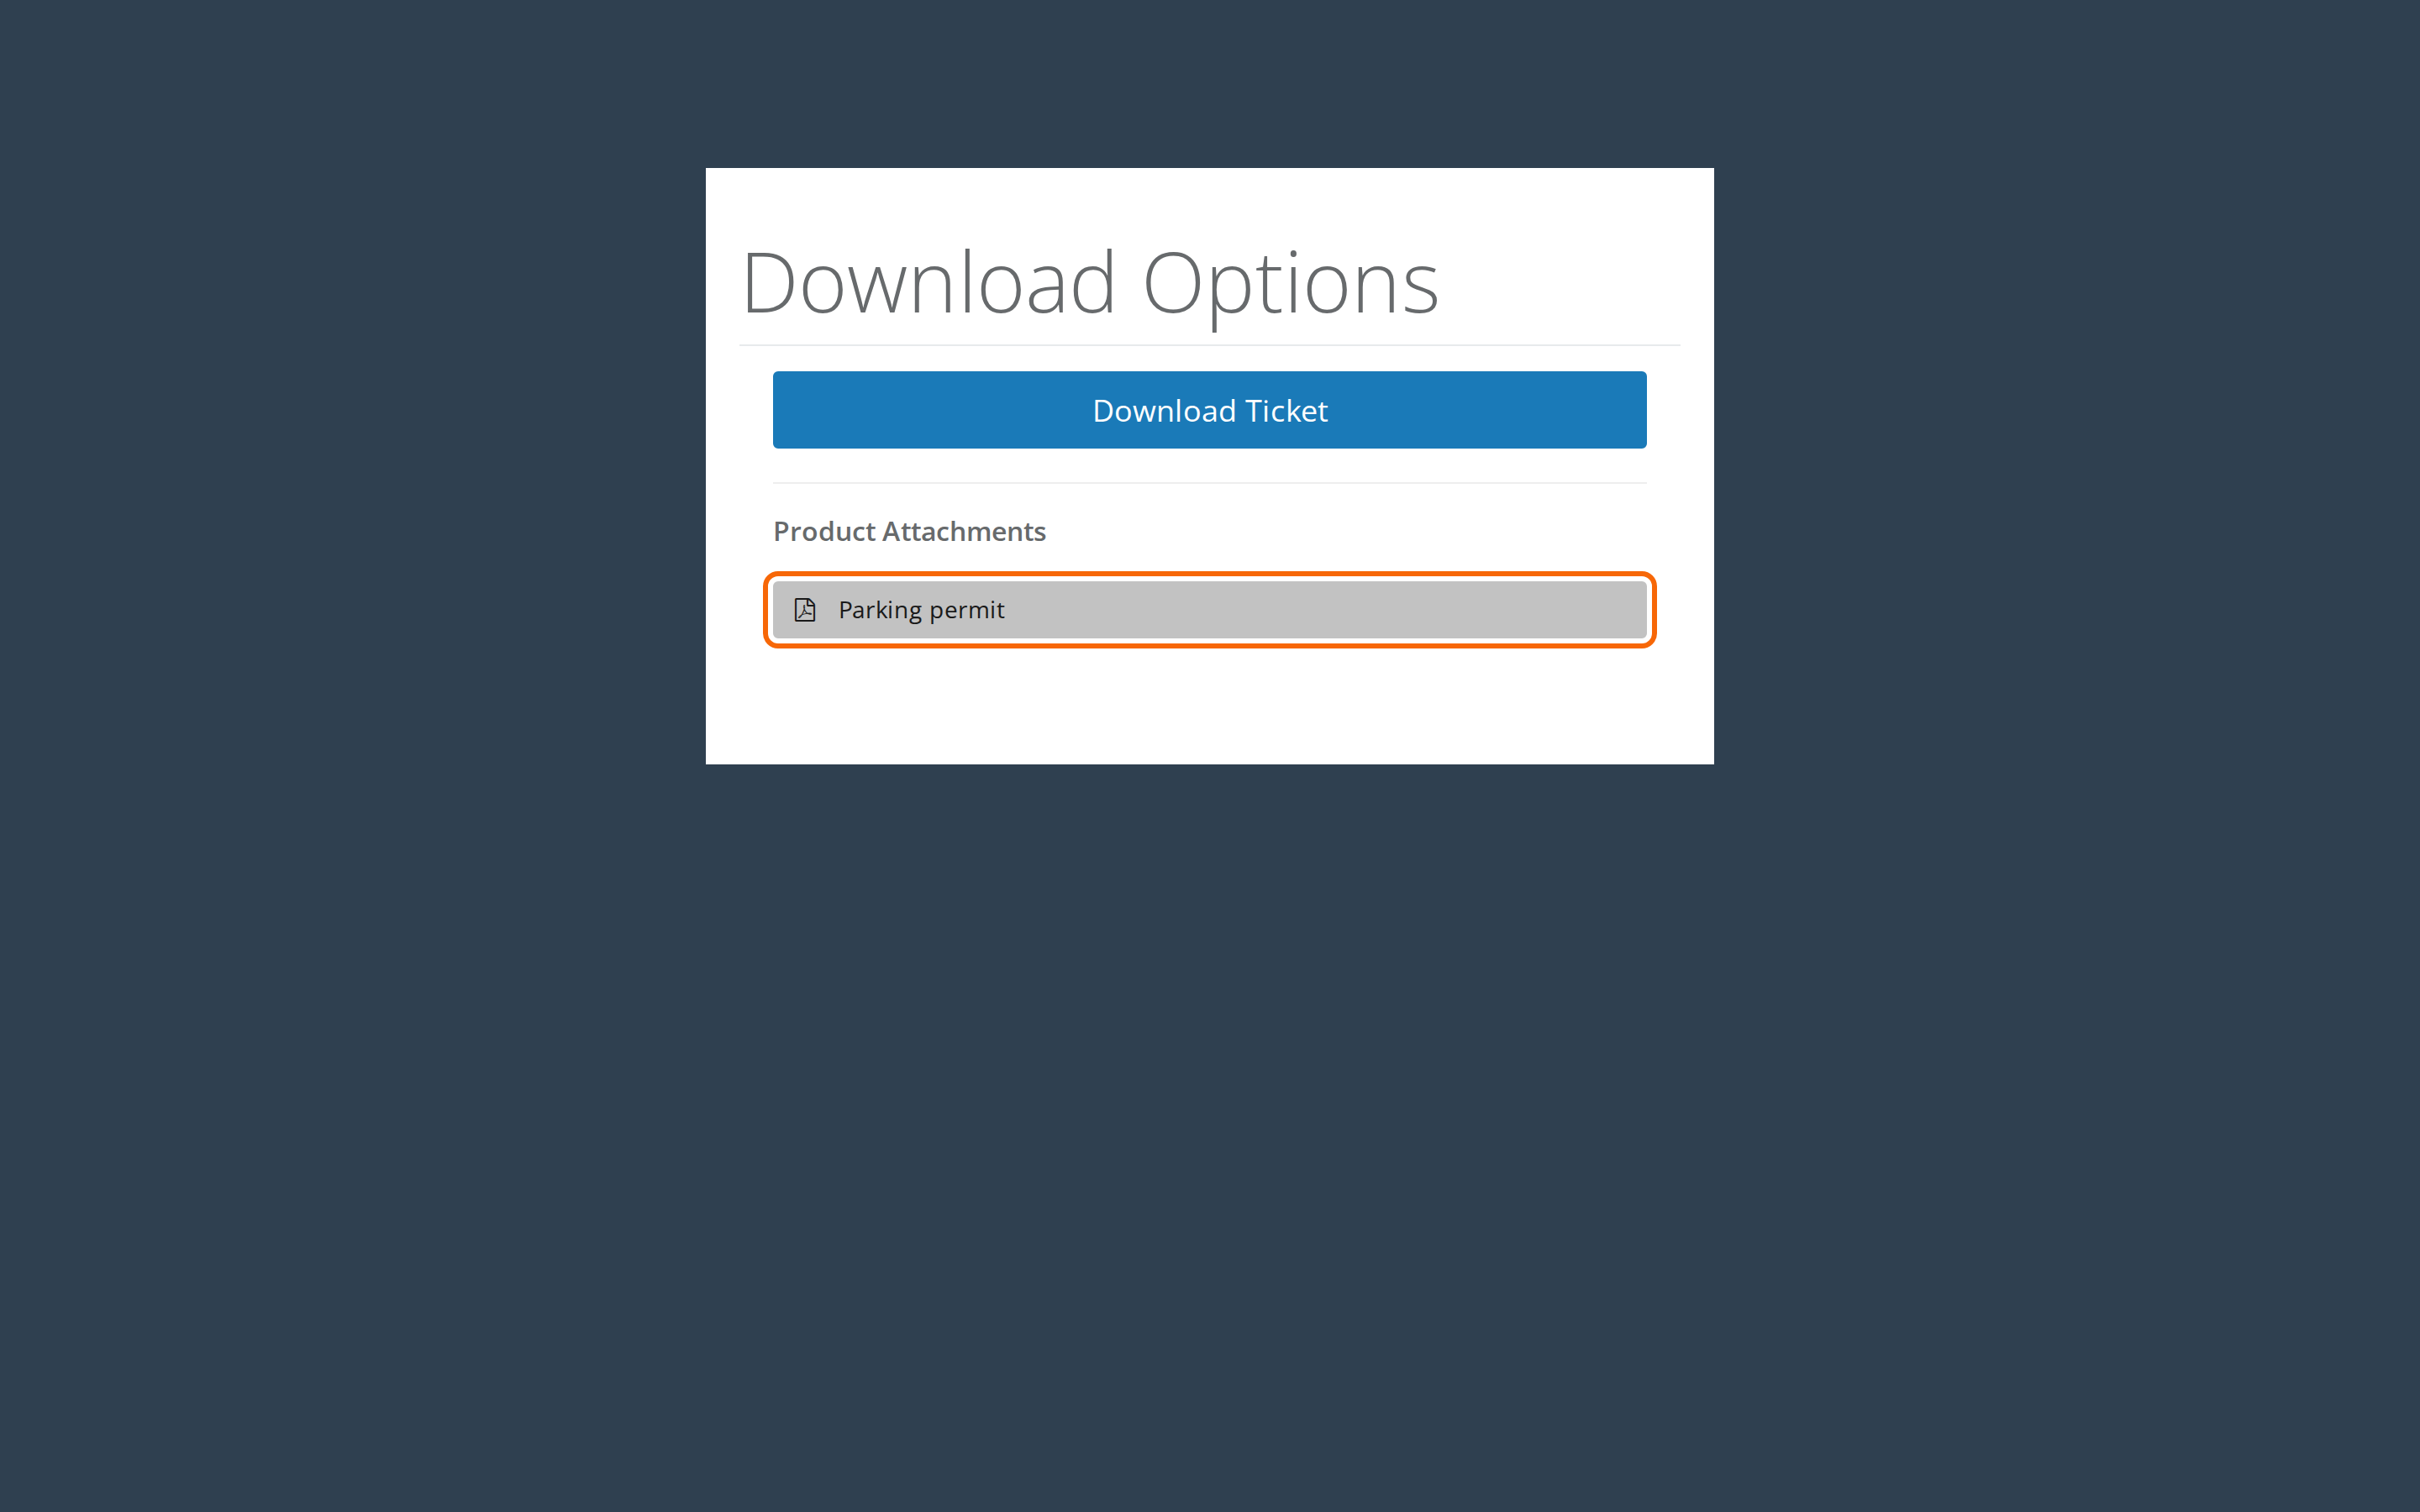
When the person has a product with a PDF, My ticket opens the Download Options page. Here the person gets the ticket with Download Ticket and the PDF under Product Attachments, where there is a button with the product's name. Guests reach the same page through the link in their email.
Edit or delete a product
Click Edit next to the product. At the bottom of the window, Ticket assigned to: lists the teams, guest lists and member types that give the product.
You delete with Delete Ticket item. The button is greyed out as long as the product is linked to a team, a member type, a guest list or a guest. Remove the product from those places first.
Pitfalls
- Doubled up: If the same product is on both the member type and the team, the person gets both. Put it in one place only if everyone should get one.
- The team reserves for every place: If the team has a Member limit, Crewstack assumes the team will be full. A team with room for 20 and 1 wristband per person takes up 20 wristbands of the global limit, even before anyone is on the team.
- When the product runs out, nobody else can join the team: When a new person joins a team, Crewstack also checks the limit. If there are none left, the crew member gets the message "There is not enough … available" when signing up, and you get the same message if you add people to the team. Raise the Global limit on the product.
- The bonus product doesn't arrive: Shifts on a schedule that isn't published don't count. Also check that the person has the member type, and that their hours or shifts are between the two numbers in the rule.
- The member type doesn't check the limit: Products on a member type are handed out regardless of the Global limit. Keep an eye on Used in the list.
- The product isn't on the ticket: Check that Show on Scanner and PDF ticket is on, and that the ticket template under Tickets > Ticket templates has a field for the product's group. See Ticket templates.
Didn't find the answer? Write to support@crewstack.io.