
Advanced search, bookmarks and columns
How to use the filters under Members, save a search as a bookmark, choose columns and answer the common questions, such as who is checked in on a team and who hasn't accepted their shifts.
The search under Members is more than a search field. With the filters under Show advanced you can find exactly the people you need, for example everyone on a team who is checked in, or everyone who hasn't accepted their shifts. Save the search as a bookmark, choose the columns you want to see, and send a message or download an Excel file with the result.
How to search
- Go to Members.
- Click Show advanced to see the filters.
- Set the filters you want to use, and optionally type a name, email or phone number in the search field at the top.
- Click Search.
All filters apply at once. If you set Team to Bar and Checked in to Yes, you only get people who are both on the team Bar and checked in. If you choose several values in the same filter, for example two teams, you get people who match at least one of them.
A filter with Yes, No and All doesn't filter while it is set to All. Clear sets all filters back to the start.
Four of the filters don't start at All, so the search only shows people who have fully completed signup. See Can't find a person in the search.
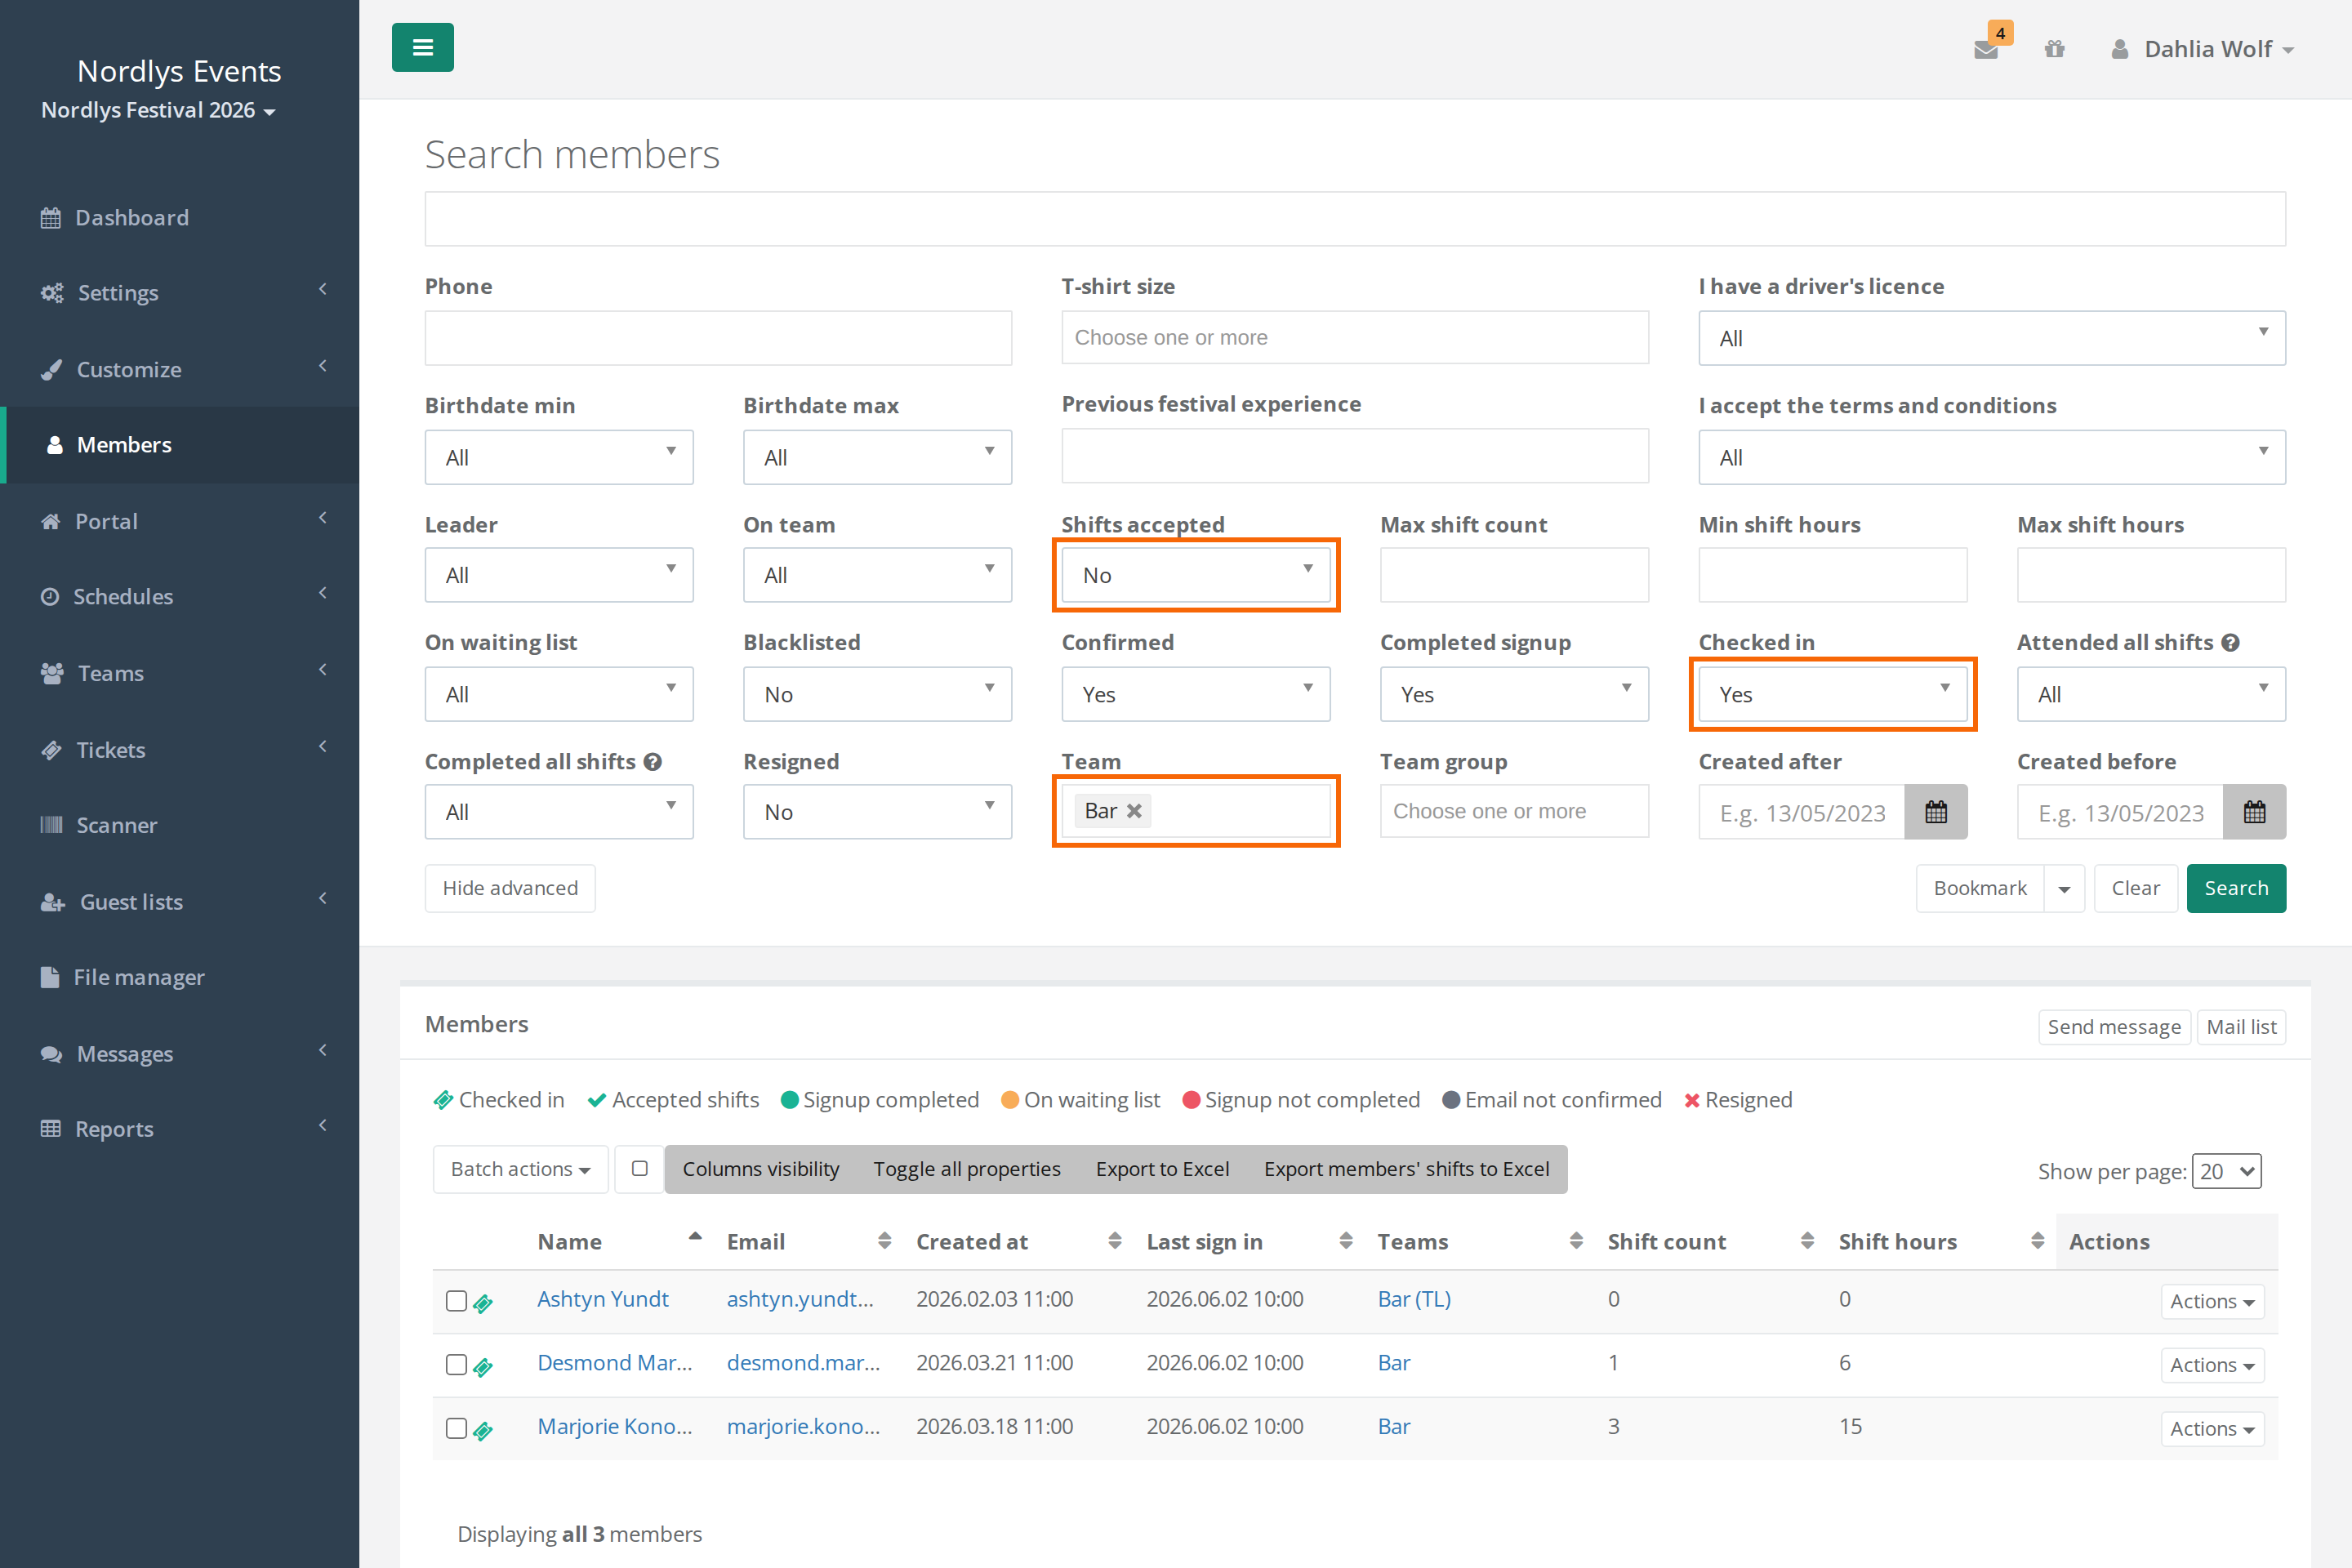
The filters
Which filters you see depends on what your event uses and on your role.
Filters that admins, team leaders and group leaders all have:
- Member type: one or more member types.
- Admin type: Super admin, Admin, Guestlist admin or Not admin.
- Leader: Team Lead or Group Lead.
- On team: whether the person is on at least one team.
- Shifts accepted: whether the person has accepted all their shifts. See Shift acceptance.
- Max shift count, Min shift hours and Max shift hours: how many shifts and shift hours the person has.
- On waiting list. See How the waiting list works.
- Paid in full, if you use membership payment.
- Member type tags and Team tags, if you use tags.
Filters that only admins have:
- Confirmed, Completed signup, Resigned and Blacklisted. As a team leader or group leader, your search always shows only people who have completed signup and who are neither resigned, blacklisted nor passive.
- Is passive, if you use passive users.
- Checked in: whether the person's ticket is checked in.
- Attended all shifts and Completed all shifts: whether the person is registered as attended or completed on all their shifts.
- Team and Team group: one or more teams or team groups. If you choose a team group, all teams in the group are included, also in its sub-groups.
- NFC chip: the number of the person's chip, if you use EventPos. See NFC chips with EventPos.
- Created after and Created before: when the person was created in the event.
Data fields: Every data field you have access to has its own search field at the top of Show advanced. Name and the CPR number have no search field. Text fields search for part of the text. Select fields show their answer options, checkbox fields have Yes, No and (blank), where (blank) finds those who haven't answered. Number and date fields have a from and a to field, and Birthdate searches by age from and to. See Data fields and who can see them.
Save a search as a bookmark
If you often search the same way, save the search:
- Set the filters and click Search.
- Click Bookmark.
- Type a name in Bookmark name and click Create bookmark.
The bookmark saves the search field, all filters, the sorting and the number per page. You find it in the arrow next to Bookmark. Click the name to run the search again. Click the cross next to the name to delete it.
Bookmarks are your own. Others can't see them, and they only apply in this event. Two bookmarks can't have the same name.
Choose columns and sort
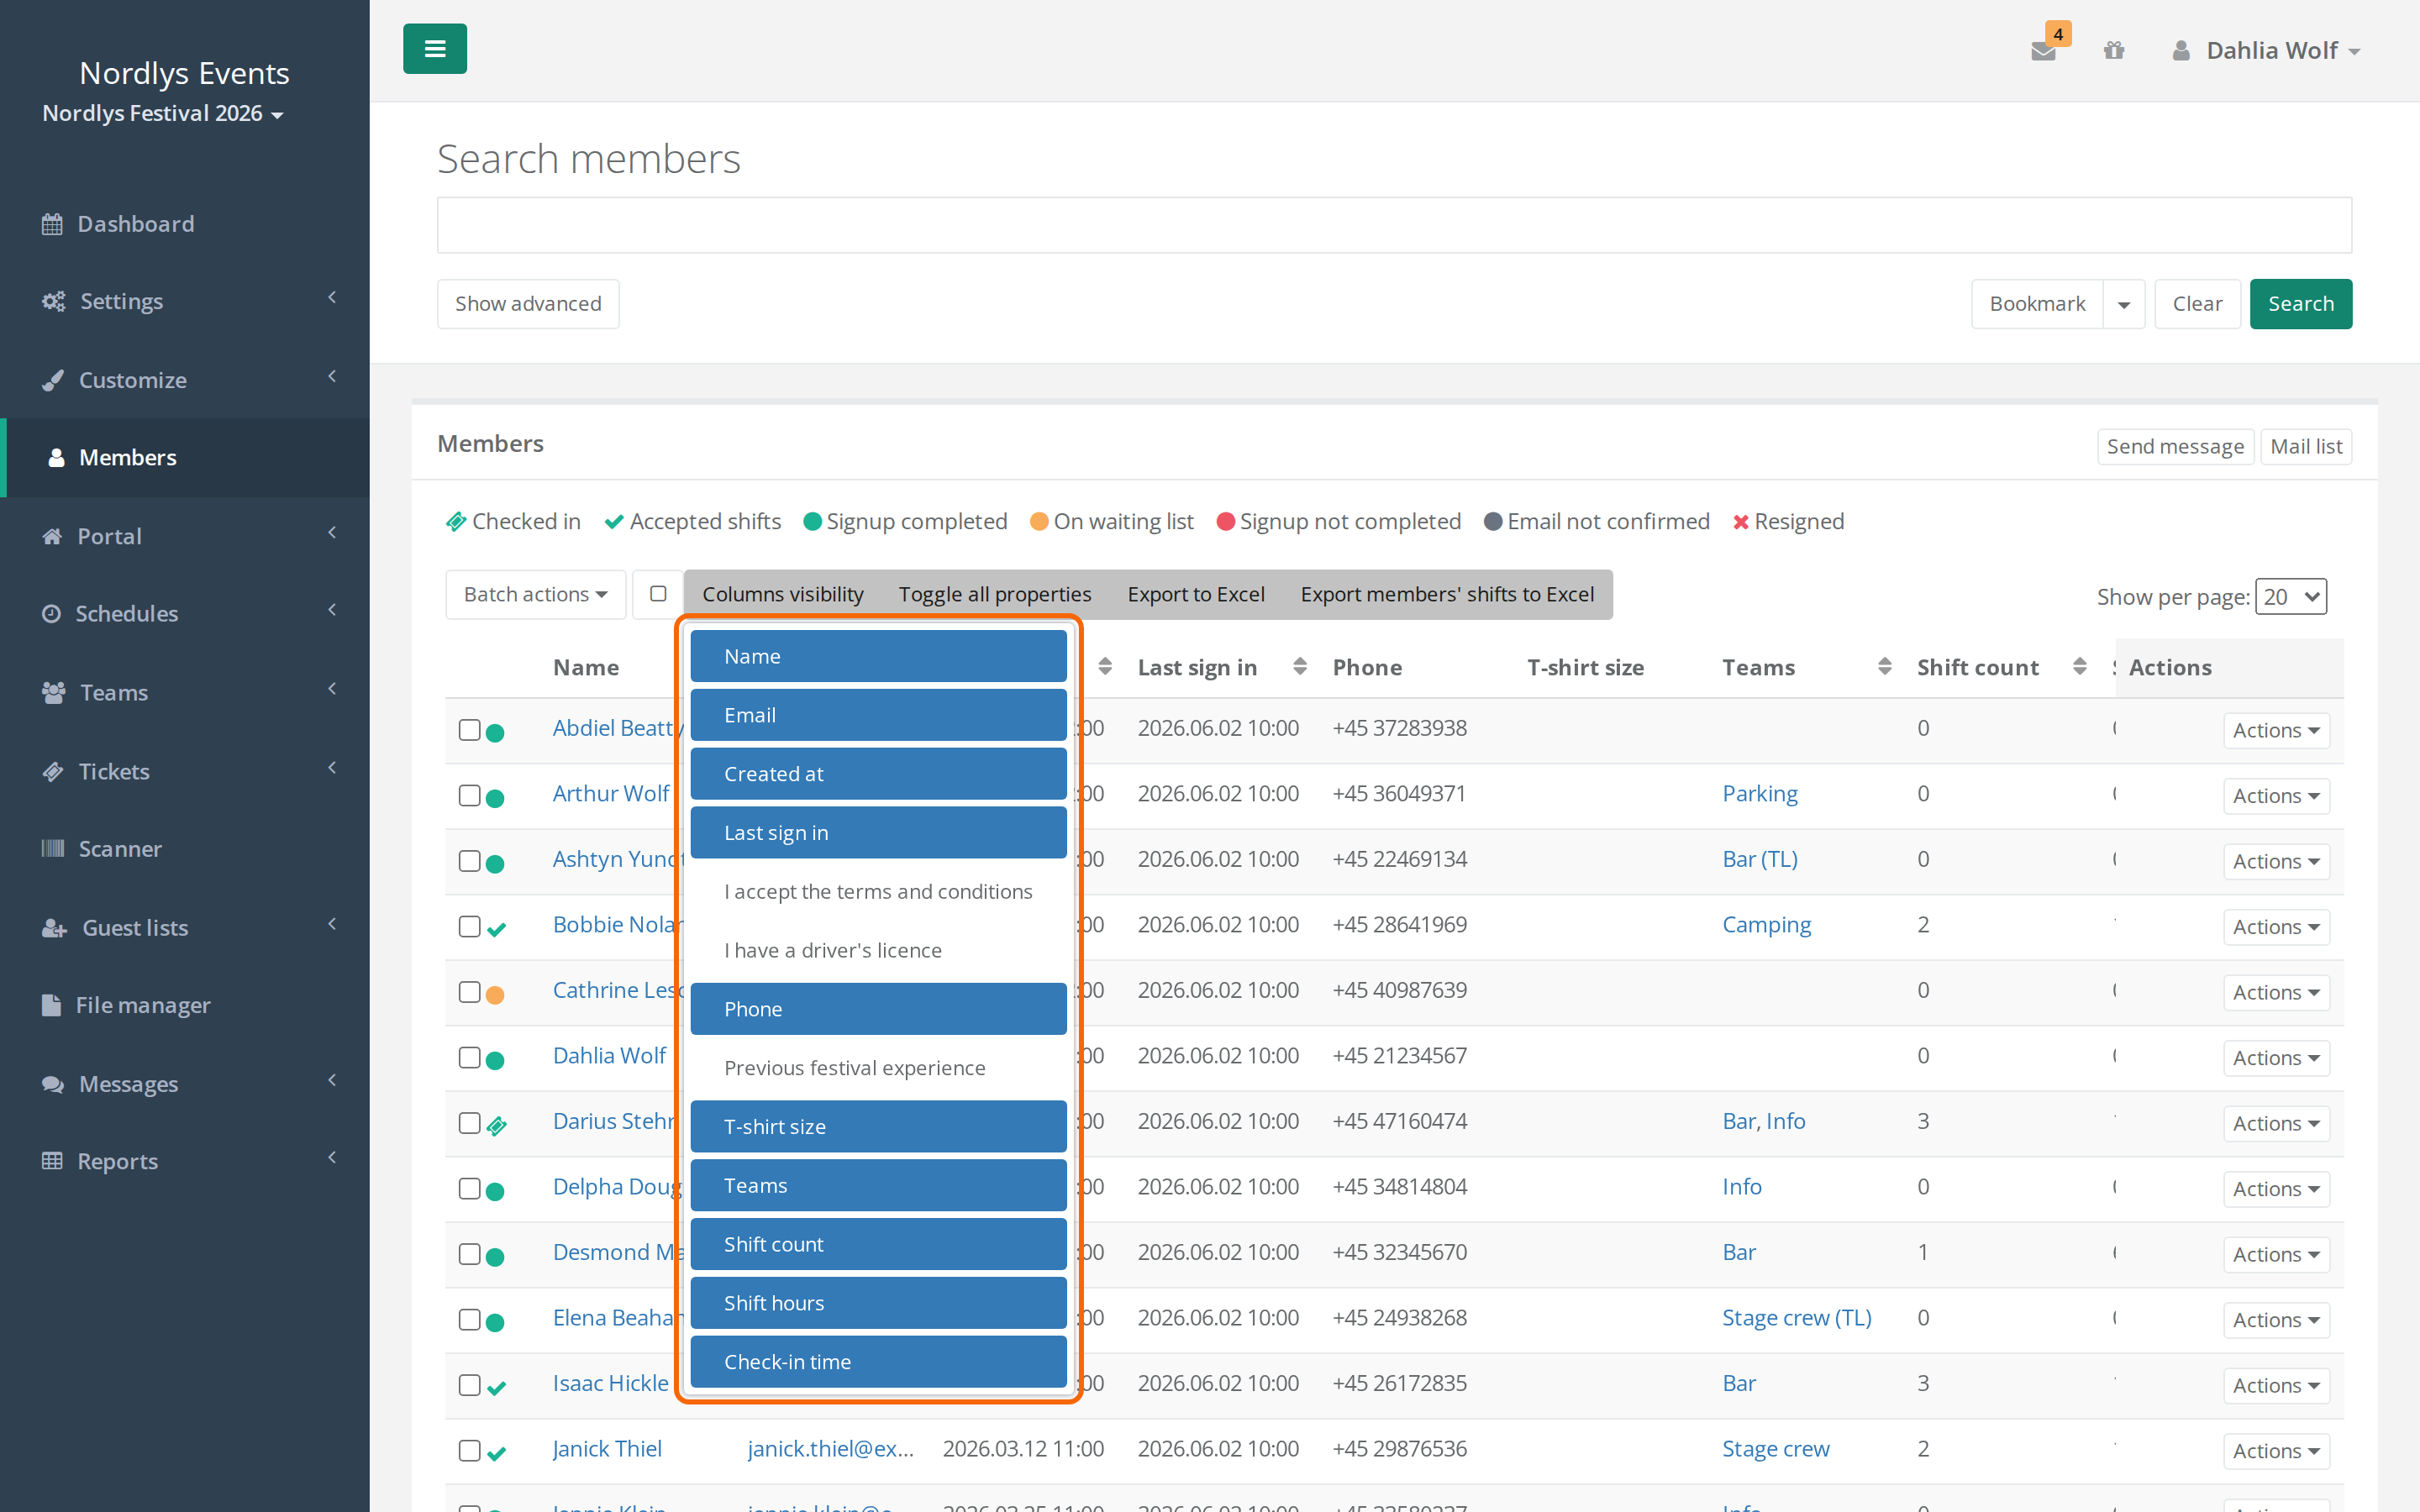
- Columns visibility above the table shows a list of the columns. Click a column to show or hide it.
- Toggle all properties shows or hides all data-field columns at once. The data fields are hidden from the start, and so is the column Check-in time.
- Click a column's heading to sort by it. Click again to reverse the order. The whole result is sorted, not only the page you see.
- Show per page chooses 20, 50 or 100 people per page.
Your columns and number per page are remembered in your browser, not on your account. On another computer, or if you clear the browser's data, they are back at the defaults. A bookmark doesn't save the columns.
Do something with the result
- Export to Excel gives you all people in the search with the columns that are shown. See Export people to Excel.
- Send message at the top of the table sends a message to everyone in the search. Only admins have the button. See Messages.
- Mail list shows the email addresses of everyone in the search in two fields, one to paste into Gmail and Mac Mail and one for Outlook. Passive people aren't included.
- Tick some people and use Batch actions above the table to do something with them, for example Add to team, Change member type, Resend confirmation email or Resign member. The button with the square next to it selects everyone on the page or clears the selection.
Search recipes
The search is the fastest report in Crewstack. Here are the answers to the questions we get most often. The recipes with Checked in, Team and Resigned require you to be an admin.
Who is checked in on a team? Set Team to the team and Checked in to Yes. Show the column Check-in time to see when. Set Checked in to No to see who is missing. The dashboard shows the numbers per day and per hour, and Reports shows who at the gate checked people in. See Dashboard and widgets and Check-in reports.
Who hasn't accepted their shifts? Set Shifts accepted to No and Min shift hours to 1. Without the hours filter you also get everyone who has no shifts at all. Select everyone and use Send message to remind them. See Shift acceptance.
Who has no shifts? Set Max shift count to 0. If they are on a team, you can set Team to the team and find those who lack shifts there.
Who has too few or too many hours? Use Min shift hours and Max shift hours. Those with under 8 hours you find with Max shift hours set to 7.
Who hasn't joined a team? Set On team to No. Select them and use Batch actions > Add to team. Set On waiting list to Yes to see the waiting list. See How the waiting list works.
Who hasn't completed signup? Set Completed signup to No and Confirmed to All. You find those who haven't confirmed their email with Confirmed set to No. Select them and use Batch actions > Resend confirmation email. See Signup status: who can sign up? Crewstack can send those who have confirmed their email one reminder to finish signing up. See Automatic emails and SMS reminders.
Who has a particular product? There is no filter on products. If people get the product through their member type, search by Member type. If they get it through a team, search by Team. How many of each product have been handed out is shown by the Product handout overview widget on the dashboard. See Dashboard and widgets. If you need a list of people with a particular product, ask AI Member Analysis if it is switched on for your event. See AI-powered data analysis and exports.
Who are the team leaders? Set Leader to Team Lead. Use Mail list to write to all of them from your own mail program.
Who has signed up since last time? Set Created after to the date. Set Team to a team to see the new people on the team.
Who is under 18? If you have the Birthdate field, set the to-field next to it to 17. The age is calculated as of today.
Who has resigned? Set Resigned to Yes. See Resigned users – find and restore.
Pitfalls
- The search doesn't show everyone from the start. Confirmed and Completed signup are set to Yes, and Resigned and Blacklisted to No, so people who haven't finished signing up aren't included. Set them to All when you want to see everyone. See Can't find a person in the search.
- Shifts accepted = No also includes those without shifts. Combine it with Min shift hours or On team if you only want to see those who have shifts to accept.
- Shift count and shift hours count all shifts, including shifts on schedules that aren't published yet.
- Bookmarks don't remember the columns. Columns and number per page are saved in the browser. If you open a bookmark on another computer, you have to choose columns again.
- The table is wider than the screen. If you show many data fields, you can scroll the table sideways. Hide the data fields you don't use, so Actions next to each person stays easy to reach.
- A change you just made isn't there yet. The search reads from a copy of the people's data that is updated in the background shortly after a change. Wait a moment and search again.
- A number the search can't give you. The search shows people, not counts. You find numbers per day, per team or per hour on the dashboard, and the number on shift in a period under Shift Report. See Dashboard and widgets and Overview and export of schedules.
Didn't find the answer? Write to support@crewstack.io.